Tuesday, January 31, 2017

7 Healthy On The Go Snacks For Bloggers and Artists

Disclosure: This post contains affiliate links.

I don't know about you, but in my creative career, I rarely feel like getting up from my project to make a snack. Something to grab while I'm still working is what I want. Not only do I want convenient, I want healthy too.

I'm going to share with you seven of my favorite healthy snacks. Due to health complications, I follow the paleo diet. This means no gluten, grain, dairy, legumes (that includes peanuts), soy, or refined sugar. That makes these snacks relatively allergy friendly.

I'll break  these snacks into two categories: sweet and savory. Now keep in mind, while these are made of healthy ingredients, too much of a good thing can be a bad thing. But if you must indulge (it happens to the best of us) these are a much better choice than candy and cheese puffs! Alright then, let's start with savory.

Savory Snacks

Terra Chips & Wholly Guacamole

This is such a satisfying combination. Terra Chips are made from vegetables but they don't taste 'healthy' like you would expect. They can taste similar to tortilla chips, depending on the variety you get. My absolute favorite are the Taro Chips.

What better pair for chips than guacamole? My favorite guacamole is Wholly Guacamole. It's made from pure, simple ingredients with no additives. That's my kind of food. When I eat this guacamole with my taro chips, my taste buds dance!

Almond Butter

Almond butter is a great source of protein. And it was my go to snack (until I developed an intolerance from eating way too much of it) and I can't wait to eat it again! Usually I just ate it straight out of my own personal jar. There is a brand that sells them in individual, serving size packets called Justin's Almond Butter. I haven't tried them personally but I've heard nothing but good things about this brand. They also offer sweetened and flavored varieties like maple and vanilla. When I can eat almond butter again, I'm definitely going to try these!

Plantain Chips

Warning: these are so addictive! They have that perfect crunch and just the right amount of salt. Now they're usually made in palm oil so you don't want to make these your go to snack, more like a special treat. I get mine from the bulk bins at my local store, but there are brands that sell them as well, such as Inka Chips.

Sweet

Dang Coconut Chips

Another warning on an addictive snack here! Dang Coconut Chips are a glorious little wafer of melt in your mouth goodness. My favorite variety is the Caramel Sea Salt. When I have a bag of these, I am one happy camper. They also make a great crunchy topping for desserts or breakfast foods!

Larabars

Fruit and nuts are what you'll find in these. Larabars are a great alternative to the typical cereal bar. They have so many flavors like apple pie, lemon, banana bread, brownie, and my personal favorite Chocolate Chip Cookie Dough. These are so convenient and they sure do hit the spot when I'm hungry!

Coconut Butter

Another great eat right out of the jar snack is coconut butter, also known as coconut manna. I eat this when I feel like I need an energy boost, and it helps a lot. I usually get Nutiva Organic Coconut Manna. It's smooth and creamy and delicious. Sometimes I'll add a little raw honey and vanilla to it and make a frosting. It's very versatile.

Hail Merry Miracle Tarts

These are heaven on earth. Be warned, they're very rich and filling. But so worth it. The tarts are more of a dessert than a snack, but we can make an exception this time right? *Smile*. My favorite drool-worthy flavor is Persian Lime. At this moment my mouth is watering just thinking about it.


These are all my favorite healthy (sometimes indulgent) snacks. Each one of these can be found at your local Whole Foods. Many of them can be found at places like Kroger and Target. Look for them next time you're grocery shopping!

What's your favorite healthy snack? Share in the comment section below. And don't forget to subscribe for more healthy living tips for bloggers and artists!

Monday, January 30, 2017

4 Common Blogger/Artist Health Problems (And How To Fix Them)

Disclosure: This post contains affiliate links.

We as bloggers and artists, despite what many people think, put a lot of strain on our bodies in our line of work. The strain comes from hours hunched over our desks, over-working our wrists, and sitting all day in a chair. Pain may not be an immediate result from this type of lifestyle, but over time, it will set in and take a toll on our bodies. Below are the four most common health problems bloggers and artists have, and solutions to fix, or prevent, the damage they cause.

Carpel Tunnel

I've had carpel tunnel since I was about twelve years old. It came after too many art and writing projects and got progressively worse as my school career went on. When we spend years typing, drawing, painting, carving, sculpting, and doing other such creative activities, we can cause damage to our wrists and hands. There are special tools that can help prevent discomfort.

Ergonomic tools are a go-to for helping people with carpel tunnel syndrome and even arthritis. If you're a blogger, you need an ergonomic keyboard wrist rest to take the strain off of your wrists from typing. If you're an artist, you need an ergonomic grip for your pencils and pens. There are specially made paint brushes with this feature. These tools are created to distribute pressure more evenly across your hand.

Another very simple way to help deal with the strain is taking quick breaks a couple times an hour to stretch your wrists and hands. Roll your wrists in both directions, stretch your fingers forwards and backwards. Do this for a few minutes to get the blood flowing in your hands.

Combining stretching and ergonomic tools will help greatly with the discomfort that comes from working with your hands.

 Neck Strain

Neck strain is another common problem for artists and bloggers. Our workspaces are below eye-level and require us to look down, hanging our heads, adding strain to our necks. There are two simple fixes for this problem.

The first is to take frequent breaks. Roll your neck side to side and stretch your shoulders. The second is to raise your work surface closer to eye-level. By doing this, you'll not have to hang your head as low, therefore taking strain off of your neck. You can raise your computer by setting it on a small, sturdy box or even a few books. If you're an artist and don't use an easel, invest in a art desk that has an adjustable surface angle. Or, if you can't invest into an entire desk, you can get a portable desk box easel. By simply raising your work surface, you can relieve neck strain.

Poor Circulation

Circulation problems are probably the most common issue for creatives. We're most often sitting, working tirelessly without a thought of standing up, only finishing our projects. This inevitably leads to a lack of proper blood flow to our legs and feet. There are two things I do to combat this.

The first is stretching (see a theme here?). Get up frequently with an emphasis on stretching and moving your legs. Yoga is great for this; a gentle workout that provides great benefits. Or you can just turn up the volume on your favorite song and jam out for a little while. It's up to you, just get moving!

The second thing I do is use a foot roller. Whenever I'm sitting down to write or work on my art, I just place it under my feet and roll it back and forth. The way it works is by stimulating the pressure points on your feet. The one I use can also be frozen or heated to add extra therapeutic power. You can find it here.

Back Pain

Sitting all day also can lead to back pain. And, if you chronically sit with poor posture, it can lead to a misaligned spine. I've found three things to help prevent this. The first you've probably already guessed.

Stretching. Yup, you guessed it! Stretching and yoga will promote proper blood flow to your spine and create a strong core necessary for a healthy posture. If you're having trouble sitting up straight, you may need to get special tools to help you do that.

A posture corrector will help you sit up straight by pulling your shoulders back just enough that you can't hunch over. Or, if your lower back is the problem instead of the shoulders, you can use a tailbone pillow. This will help with hip pain as well as back pain. Yay for added comfort!

The final thing is to see a chiropractor. Many people don't like the thought of going to one, but I have had a good experience. Not only has my back pain decreased, but my neck pain as well. I highly recommend it!


There you have it, four common blogger and artist health problems and ways you can fix them. Make sure to keep your health a priority so that you can keep creating and doing what you love!

Have you experienced any (or all) of these problems before? What did you do that you found helped? Share in the comment section below and don't forget to subscribe at the top of the page to stay up to date with artist and blogger lifestyle tips!

Saturday, January 28, 2017

8 Best House Plants For Your Creative Workspace

Disclaimer: this post contains affiliate links.

House plants are one of my favorite things to decorate with, and my creative workspace is no exception. They make everything feel fresh and alive. Upon doing some research, I have discovered there are eight plants that are specifically beneficial for artists to have in their studio and bloggers in their office!

In the 1980's NASA conducted an experiment lead by B.C. Wolverton investigating the air purification abilities of several house plants. I've selected eight of those plants, based upon the results of the test, that give extra benefit to artists and bloggers. These plants filter out the chemicals in the air that may be produced by your supplies and equipment!

English Ivy

A fairly well-known plant, English Ivy was shown to filter out benzene and trichloroethylene. These chemicals can be found in your paint, dyes, adhesives, and even printer ink! Place the plant on a stand in the corner of the room or make it a hanging plant!

Cornstalk & Red-Edged Dracaena

These two relatives also filter benzene and trichloroethylene out of the air. A Dracaena type plant is perfect to place in the corner of a room; they grow vertically. This is great if you don't want to take up any space from your work surface.

Chrysanthemum


Let's change things up with a bright, colorful flowering plant. It's said that bright colors improve your
mood and inspire creativity. We definitely want more of that in our creative workspaces! Not only are
they stimulating to your brain, but they also filter out all of he chemicals tested in the experiment. This includes benzene, trichloroethylene, formaldehyde, xylene, toluene, and ammonia. These chemicals can be found in many products, including household cleaners. I'd consider the 'Mum' an all-star plant!

A pink Chrysanthemum blossom.
Variegated Snake Plant

This one is a nice plant to put on your desk. Another vertically growing plant, it does a great job at filtering out benzene and trichloroethylene. Little space taken up, easy to take care of, and cleaner air, perfect for the small studio or workspace!

Peace Lily

The Peace Lily is another 'all-star' plant. It filters benzene, trichloroethylene, formaldehyde, xylene, toluene, and ammonia out of the air. These plants produce bright white flowers, great for the workspace with an airy vibe. It is also a very tolerant plant and good for those without a 'green thumb'.

Barberton Daisy

Barberton Daisies are the perfect plant for an artist or blogger with concerns for their pets. They filter benzene and trichloroethylene out of the air and are non-toxic to pets and children. So, if you think Fido or little Billy is going to take a nip at your house plant, this is the one to get. Bonus: they have beautiful flowers!

A beautiful, orange Barberton Daisy

Aloe Vera

Aloes are a favorite among many people. While they do have great air purifying abilities, as all of these plants do, I chose to list this one for another reason: it's healing capabilities! When the gel on the inside of the leaf is applied to a cut, wound, or burn, it helps speed up the healing process. If you keep one of these in your workspace, you won't need to worry if a project goes awry, or get a paper cut (we all know how painful those can be!).


All of these plants are perfect for your studio or creative office. Your air will be cleaner and your space brighter. Don't miss out on the health benefits these guys have to offer! Visit your nearest plant nursery or store to pick one (or more) out to come home with you. Or, if you're more the do-it-yourself type, check out the list of supplies and tools below that you can choose from.

Which kind of houseplants do you have? Share in the comment section below. Don't forget to subscribe at the top of the page to get more tips and tricks for living as an artist and/or blogger!


Thursday, January 26, 2017

Healthy Living Tips For Creative Entrepreneurs


Calling all creatives! You've got to remember to take care of yourself. When you're healthy, your business is healthy. Whether you blog, run an Etsy shop, or freelance your creative abilities, making healthy choices with help your business thrive.

But this isn't just any typical healthy living post, this is geared directly to the needs of all artists (that means you too bloggers, I consider you 'word artists'!) We need specialized tips for our line of work. Alrighty then, let's get started.

Exercise

Getting the proper exercise is especially important for artists and bloggers because we spend most of the day hunched over our work. This can mess up your spine's alignment, which can cause a whole lot of other issues. At the very least, we need to stretch multiple times a day. A perfect way to do this is to practice yoga.

Yoga is a wonderful form of exercise. It's easy on the body while still promoting healthy blood flow and toned muscles. If you're not into cardio or lifting weights, yoga is definitely for you. Not only that, but it's easy to do in the comfort of your own home. There are several YouTube channels you can follow, or, you could use a site like MyYogaWorks*. Whatever you choose, make sure you get moving! Focus on stretching your back, neck, and hands. These areas get the brunt of our work.

*Not an affiliate link, just a really great site I wanted to share!

Food

Eating the proper foods is the foundation for good health. I know this especially well; I have Celiac Disease and changing my diet has helped me heal. There is a 'diet' I'm rather partial to: the paleo diet.

The Paleo Diet is great for all lifestyles because it cuts out all junk food by default. Now that doesn't mean not eating treats, because there are some pretty darn delicious ones like these. But by eating more nutritious foods, you're really supporting your creative process. Processed foods can cause a symptom called "brain fog" (not being able to think clearly or quickly) which can affect your work. How can you come up with new and exciting ideas if your brain is taking a nap? It's time to buckle down and eat healthier!

Mindset

We creatives tend to be very critical of our own work. This can lead to us having a negative mindset about ourselves and possibly the world around us. Negative thoughts are very bad for your health; they keep you from enjoying life to the fullest.

You see, as artists of all different kinds, we have the job of capturing all that is wonderful and meaningful in this world and funneling into a single artwork. If we live life  through a negative lens, we won't be able to do our job properly. We are here to help people, to inspire them. You may think that using the 'rose colored' lens in life is just plain naïve. But I beg to differ. It's a choice, a choice to see the good. When we make this choice, we realize that nothing is impossible for us. And then, only then, will new heights be reached.

Relationships

Creative entrepreneurs often spend their entire workday working on their craft. This type of work can make for a very lonely, and arduous day. Making relationships a priority is vital for any person's health.

Artists can become very comfortable in their solitude, but we must push ourselves out into the world. Get our minds off of work, relax, and experience new things. Not only will this enrich our minds and therefore our creative process, but it will also give us that support system we all need on those tough days. Whether it be a family member, a romantic relationship, or a friend, start planning a fun night out in the next week. Leave your work for awhile, be refreshed. Your business will thank you in the end.


Exercise, food, mindset, and relationships are the cornerstones of healthy living for all people, especially artists. This week, get out there and move, eat smart and well, think positively, and have fun with your loved ones.

Do you have any tips for being a healthy artist? Share in the comment section below!

Don't forget to subscribe at the top of the page so that you don't miss more tips for living as an artist!

Tuesday, January 24, 2017

How To Easily Come Up With New Products

Coming up with new product ideas can become difficult pretty quickly when you start your creative business. It was difficult for me before I even started! I tried very hard to come up with new and fresh concepts off the top of my head. Can anyone you relate?

I had to do something about this to prevent my small business from crashing before ever taking off. Just about as fast as I could, I developed a new anti "creative block" system. And now I going to share it with you!

Look To The Pros

Who better to get inspiration from than the people who have been successful? Now this is important. Do not copy their work. We're there to see the endless possibilities and spark an idea, not use somebody else's. Looking at the work of the 'pros' in your industry gives you a goal to shoot for. For me, this means looking at the work of famous artists and designers. For someone who knits or crochets, this could mean looking for inspiration at clothing stores. You get the picture.

Get Inspired By What's Around You

You can find inspiration for new products all around you. Go outside and be in awe of nature's beauty. Listen to a new music style. Look at those eye-catching pictures on Pinterest (you can find anything there, can I get an amen!) A certain color, sound, or smell could spark your next big idea. I was inspired to paint an Italian scene by some opera music I started listening to. In the end, I ended up painting three Italian themed paintings. Opera was my spark, who knew?

Research The Market

Look around to see what's trending. Not only will you be able to get some new concepts going, you'll be creating things that will be more likely to sell. Go to sites like Etsy and Amazon to see what type of products are selling the best. I jumped on the minimalist train and created some simple artworks after seeing how well they were doing for other artists.

Repurpose Your Work

When the above steps in the system don't work for you, go back to what you can trust. Your very own work. If you have a sculpted vase design that is doing well, smack a new handle on that baby. A necklace that people just can't get enough of? Make it in a new color. A blog post that went viral? Make a part two follow up! I did this with a butterfly sketch. I had one, saw that it was doing well, and then created two more to be sold individually and as a set. You are your best resource!

"Creative block" can be really tough to get through, but the above steps will of tremendous help to you. Have you been through a dry-spell before? What did you do to overcome it? Share how you created when creating didn't seem possible.

 Don't forget to subscribe at the top of the page!

Monday, January 23, 2017

The Ultimate Guide To Organizing Your Creative Business ( With A Free Printable!)

I don't know about you, but I love organizing things. My only problem is that I have trouble keeping things organized. After starting my creative business, I quickly realized that letting things go into disarray would not work. And so, I set out to develop a system to keep everything in check and ready to go for whatever need this new entrepreneur needs. First things first:

Keep It Pretty

This may sound silly, but it's the glue that keeps my routine together. I'm serious, if my supplies and / or workspace doesn't look good, I'm not motivated to work or put things in their proper places. That little extra sparkle or pop of color gets me going! You've got to find out what works for you. For me, it's my notebook with a motivational saying on the front and my 'business box' (an awesome gold and white box that I store my art supplies, notebooks, headphones, etc. in). Maybe for you, it's a stylish pen, a bright laptop decal, or even your favorite scented candle. Start experimenting!

Dedicate A Space

Now this doesn't mean that you need to have your own office because, let's face it, most people don't have room in their home for that. I would recommend having a desk in whichever room has the most space for it. That way you have everything you need in one convenient area. Bonus points if you decorate the wall space in front of you.

However, if you're like me, you don't even have room for a desk! Here's what I do, I use the living room as my 'office'. The sofa is my chair and my lap is my desk (you can get an actual lap desk too). My 'business box' is my storage space. I'll admit this isn't ideal, but as my business grows, I'll upgrade. A girl's gotta do what a girl's gotta do.

Organize Your Ideas

Don't try to keep all of that information straight in your head. Please, just don't (take it from someone
who tried). Some people use computer documents to keep things organized, and while I do recommend you use a spreadsheet to keep track of your profits and expenses from day one, I prefer to do everything else the old-fashioned way. A notebook and a pencil are my tools of choice.

I have everything in my notebook. Pages dedicated to milestones reached, pages for taking notes on articles I read about business, and pages to keep track of my ideas so that I don't forget them. All of the things I need are right there at my fingertips. I highly recommend keeping one yourself!

Organize Your Process

Now this will vary slightly depending on what your creative business is, but organizing your process is the key to making everything run more smoothly. If you write a blog, take your ideas and write out a more detailed list of the main points of your post. If you create art, organize your tools to be all in the right place before you start a project. Or maybe, you need to make your listing process more efficient if you sell on a site like Etsy.

I've created a free printable to help make listing items on Etsy less of a pain. If you use Etsy, you know that it can be a tedious process. Finding keywords, deciding which to use, making sure you use them in the right place, it can all get confusing. This printable will help organize all of that. Subscribe at the top of the page to get instant access!


There you have it, my ultimate guide to organizing your creative business. Four simple concepts that will make your workday so much easier. What do you do to keep your business organized? Share with us in the comments below! And don't forget to subscribe at the top of the page!


Wednesday, January 18, 2017

How I Use Etsy Rank For SEO

When you do any reading about how to improve your Etsy shop, you're inevitably going to see 'improve your SEO' everywhere. That's because it truly is that important. When I began working on having better SEO, I saw more of my views coming from search almost immediately. And guess what? I did it for free.

Etsy Rank

How did I do that? I used Etsy Rank. Most people use this free tool as a way to check where their listings rank under certain keywords on results pages. This is very helpful, but not the focus today. The option I most frequently use on this site is the Listing Audit found under the Listings section.

SEO Grading

Once you select a listing of your choice, you will see that your cumulative SEO has been graded. The grade is based upon how strong your keyword presence is on your listing. If your keyword shows up at the beginning of your title and description, you'll be given a grade of A for that keyword. For each element you're missing, you'll be docked a letter grade. We want to keep your keywords as mostly A's and B's. Here's an example of one of my listings for a painting print that needed a lot of work.

Example


As you can see, there's a lot of room for improvement. We want to make those x's go away by including your keywords in the respective places they are missing. You also want to include a mix of low and high competition keywords. To research which keywords are competitive, and find suggestions for related keywords, go to the Keyword Tool under the Tools section.


After making the necessary corrections to your listing, refresh the data for the page and you will be able to see how your updated listing is graded. After updating my listing, the cumulative SEO grade went up tp an A.


Those VIP tags indicate the keywords that Google will focus on the most. This way, if someone were to search with the term 'skull painting' my listing would be more likely to show up than if someone used the term 'feather art'.

Don't forget to subscribe at the top of the page so you can get more creative business tips and tricks!

Ask your questions or share your SEO tips in the comment section below!


How To Create A Free Etsy Shop Icon/Banner

Creating a professional looking shop icon and banner for your shop is vital for your business. It's the first impression you leave with a potential customer. If your icon doesn't look up to par, that customer may think your products won't be either. But, if your icon looks like time and effort was poured into it, they will think the same about your items. It's all about the presentation.

Where Can You Go?

There is a wonderful place where you can do this for free. Canva.com is a free site where you can design practically anything you need. It has preset sizes and design options for social media posts, blog posts, and even for Etsy icons and banners. I even used it to create the title graphic at the beginning of this post! Not only that, but it's extremely user-friendly. Even if you don't have an ounce of designer ability, the preset designs look wonderful as is, you only have to replace the writing with what you want it to say.

Below, I am going to show you a quick example design that took me less than ten minutes to make. Anyone can do it!
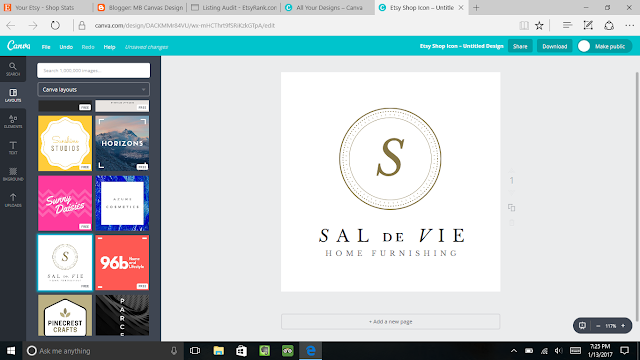
Here's a preset design for an Etsy icon. At this point, I've done nothing to the design except select it from the list to the left. As you can see, there are many templates I can choose from, and a lot more if you scroll down he list.
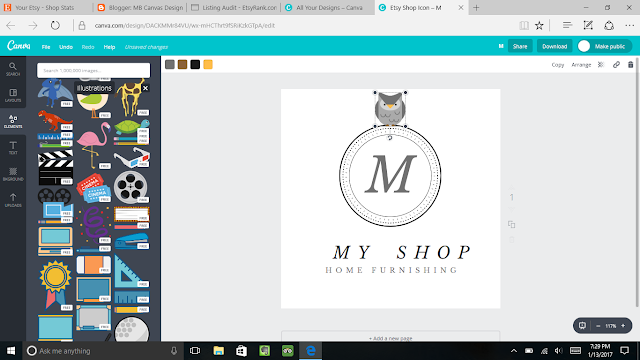
I've now replaced the words and letter in the original design with the name "My Shop" for the example. I also went to the 'Elements' section, then the 'Illustrations' section where I found this owl graphic. Then I moved it to the top of the circle so that it looked like it was perching there. 
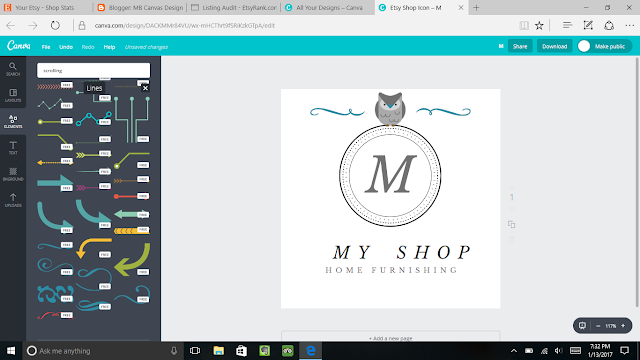
After adding the scrolls from the 'Lines' section, also under 'Elements', I changed the color scheme. To do this, I clicked on whichever graphic I wanted the color change to occur on and several color blocks popped up on the top left of the white option bar. From there you can change the individual colors to your liking. Here I used greys and blue.
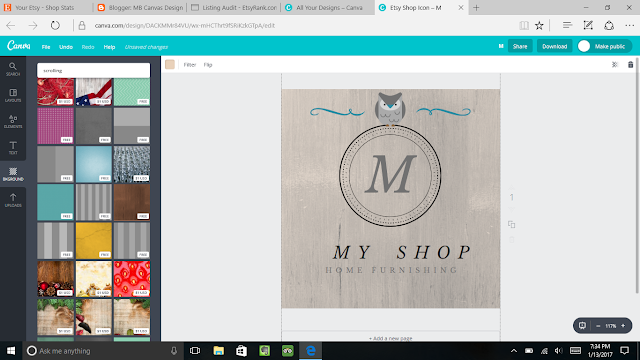
And just to show that it can be done, I added a background. From the 'Background' section I chose an image that looked like wooden planks. I changed the color from brown to grey and made it semi transparent by clicking the square right next to the trash can on the white option bar and adjusting the levels. This isn't necessary, but I included it for the example.

It's that easy! You can leave it, or customize it as much or as little as you want. It's totally up to you. And you can't beat being free. There are paid options if you like what they offer, but there are plenty of free, professional looking options. I'll leave the finished icon and two others that I took five minutes to create below. Or, you can check out my shop and see my icon and banner.

What about you? Are you good at design or do you leave that to someone else? Tell us your experience in the comment section below. And don't forget to subscribe at the top of the page!

Pen and Ink Series: Drawing Fur


Welcome to the first installation of the Pen and Ink series! This is going to be a fun adventure for both of us. I'm going to share with you the basics of pen and ink drawing. Today's lesson is about drawing fur. For each concept, refer to my drawing at the bottom of the post as an example.

Fur Drawing Concepts

1. The Basic Pen Stroke

  • The building block of fur drawing is the pen stroke pictured above. How fancy; it's a line. Why yes, yes it is. But not just any line. If you don't draw this line correctly, your drawing will look far from believable.

  • To start. set your pen to the paper (a big obviously here). Then, as you draw your line with a quick motion, lighten the pressure of the pen until it no longer touches the paper. This whole motion should take about 0.25 to 0.50 seconds. Once you've it, practice, practice, practice! Make sure the lines all go the same direction.

*Note: The 'proper' way to draw anything is by using your entire arm to make the motion, with the movement originating from the shoulder. I draw my small pen strokes with the movement originating from the wrist, which I shouldn't, but it works for me. Beware of forming this habit, it won't work on long pen strokes!

2. Fur Length

  • You can probably guess how to do this one already. For short fur, draw short lines. For long fur, draw long lines. You control this by how quickly you lift off of the paper. That's it! On the example drawing, you will see that the fur is shorter near the face and longer towards the top of the head.

3. Adding Form

  • When look at an animal, you will see that the fur will look darker and lighter depending on where the light strikes it. We need to create shadows and highlights in your drawing too, so that it will look life-like.

  • To make a shadow, add more lines, closer together. Then, to blend into the mid-tone, slowly decrease the amount of additional lines you use. Once you reach the mid-tone, decrease and space out your lines until there is more blank space than pen strokes.

  • Let's say you're drawing a polar bear. When you draw it's fur, there won't be much work to do. You will use a line here and there just to indicate the presence of fur while making it obvious that it's white.

  • Now, let's say you're drawing a black cat. This will take a whole lot of work. The majority of the coat will be composed of lines grouped closely next to each other, leaving very little, if any some places, blank space.

  • You can also create fur patterns, like cheetah, by alternating how close you place the pen strokes together.

There you have it! If you have any comments or questions, leave them in the comment section below. below is a pen and ink drawing I did of a gorilla. Take note of the distancing of the lines. Closer for darker and farther apart for lighter. You can check it out here, Now it's your turn!

Don't forget to subscribe at the top of the page so you can follow this series along with me!

Challenge: Draw a mouse! Don't forget to send a picture in when you're done.


Tuesday, January 17, 2017

How To Open An Etsy Shop With No Money


'Opening up an Etsy shop without spending a penny? How is that possible?'

You may be asking yourself these, and other questions. To answer those questions was my goal when I first opened my shop MB Canvas Design. I wanted to earn money with my talents, but I had no money of my own to invest in a business. I also didn't want to spend nothing on my shop, and have it look like I spent no money. That is how my journey began to starting a quality Etsy shop for free.

1. Opening A Shop

The first step is to open up a shop. Um, duh you say. I know, I know. It just had to be said. While having a shop on Etsy is free, to open up shop you have to have at least one listing active. Each listing costs $0.20. Here was the first dilemma I encountered in my search. Luckily, there was an easy solution; many bloggers have posts that contain a deal for new sellers.
Those who already have an Etsy shop are able to participate in a deal where they have a link that gives both the shop owner, and the person opening a shop, 40 free listings, when said person opens their shop. So in essence, you click on the link and you'll be sent to the sign up page to become an Etsy seller and receive your first 40 listing for free. Here is a link just like the one I found when I first started (Disclaimer: when you click this link, not only will you get 40 listings, I will too, at no cost to you. Yay for free!) Click here to open up your very own shop!

2. Creating Your Shop Icon And Banner

Now that you have your very own shop (Nice going!), it's time to start making things look professional. You need a shop icon to represent your business (You, yes you. You're now a business owner! Gasp) and, if you would like, a shop banner as well. There are numerous sites out there where you can pay to create one, or even have someone create it for you. But the goal here is to do everything without spending anything.

The best option I found for these purposes was canva.com. This website has a large variety of free options to create your icon and banner. To make it easier on you, they even have preset size options for Etsy shops, bloggers, and social media users. In fact, the image at the top of this article was created with canva. So are all of the other images I created for my shop, and this blog. Not only do they have plenty of free options, but they're free and professional looking. That's what we're going for. Learn how I did it here.

3. Take Pictures Of Your Items

This is something I struggled to figure out how to make look good without spending money on an expensive camera, lighting equipment, editing software, and all of the other things you'll read that you need. For quite some time, I just accepted the fact that my photos wouldn't look good. The I discovered that shabby photos don't get views. Once I figured out how to improve my picture quality, the views on my products quickly increased. All I used was my smartphone and a free computer program. With the modern smartphone, you can take high resolution photographs in seconds. Here are some quick tips to make your pictures look even better:

  1. Turn on the HDR feature.
  2. Do not use flash.
  3. Use natural light when you can.
  4. Learn to use the 'pro' mode so that you can adjust settings for each individual picture.
  5. Use Gimp to edit for your final image.

4. Use Gimp To Edit Your Pictures

Gimp was the quality game changer for me. Once I understood how I could use it, the difference I saw in my photographs was incredible. Just look at this example of a picture I took of a drawing I did for a print in my shop.


May I just say, wow. The difference is blatantly noticeable. The reason I chose Gimp was because, not only was it free, but it had all of the features I needed to edit my images that other paid for options, such as photoshop, had. It's a little challenging to learn to use, but there are tutorials all over the internet that will guide you step-by-step through the process. You can find Gimp here.

5. SEO Help

When it came to SEO (Search Engine Optimization), I was very tempted to figure out a way to spend money. That's because this is how people find you. If you don't have good SEO it is very unlikely that you'll have a lot of business from Etsy shoppers unless they find you some other way. Time after time I read stories from new sellers like me about how they signed up for a paid SEO tool, such as Marmalade, and it increased their sales by some large amount. Oh boy, was I tempted. Until I found out about a free option that is revolutionizing my SEO.

It's a wonderful site called etsyrank.com. Totally free, totally helpful. This site will grade each listing on it's SEO quality and show you where your optimization is lacking. You can also research which keywords are competitive and where your listings rank under keywords you have used. This is an extremely helpful tool. For further explanation of how I use this resource, read my post all about it.

6. Promotion

As you start up your shop, you're going to see paid promotion options everywhere you turn. No matter how tempting it may be, you do not need them. I have read countless stories about how a shop paid a good sized sum for advertising and promotion and it cost more to keep up than they earned back from it. The thing is, a lot of the most successful shop owners don't use it at all. They create an organic following through free social media platforms. If you ask a shop owner that does well how they get all of their traffic, most will tell you social media.

An organic following may take awhile to build up, so be patient and be consistent. Find which platform work for you and just go for it. You can also eventually start a blog centered around your craft or to help other shops. That is what I am doing here, and I am doing it for free with Blogger. It may not be as fancy as a paid for option but it gets the job done while looking nice.

These are all the ways I started a quality Etsy shop for free. If you have questions don't hesitate to ask them in the comment section below. Or, you can ask your questions in the Forums on Etsy. If there's one thing I've learned about creative business owners and the Etsy community, it's that they are always willing to help. I have seen people go above and beyond to help out a fellow creator. So I say to you, welcome to the Etsy family.

Don't forget to go to the top of the page to subscribe so you can get more tips and tricks!